

Project Info:
- 1 Little Om Button
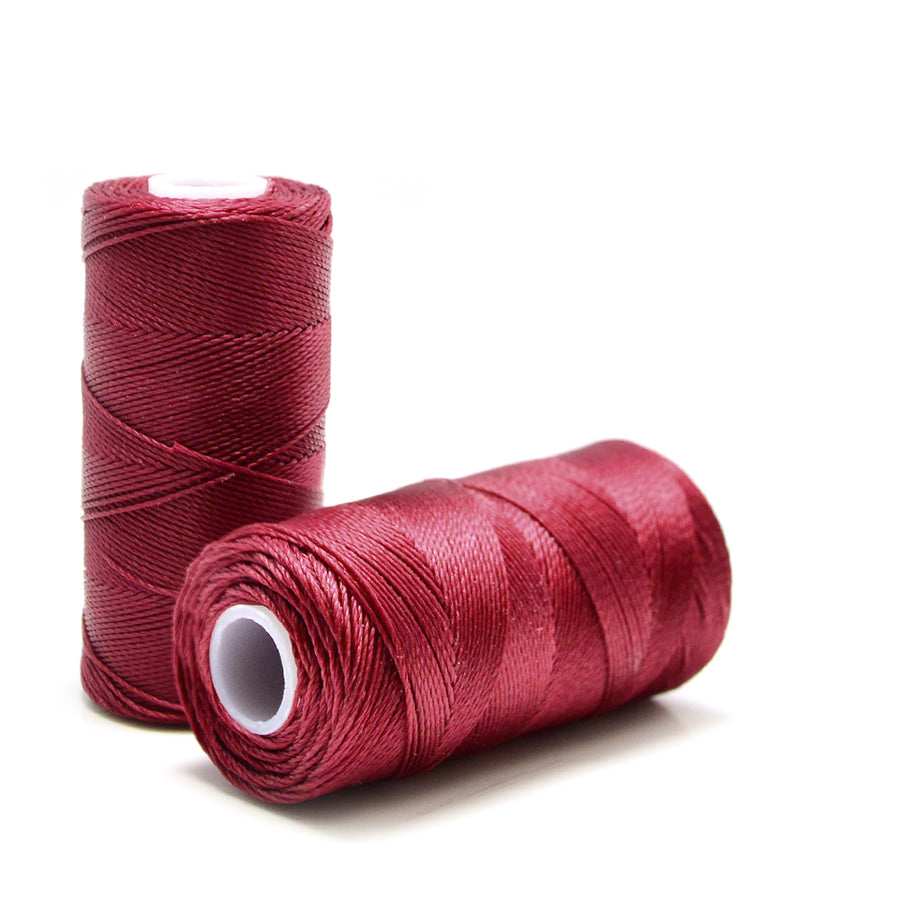
- 1 Spool Wine Micro C-Lon
- 1 Strand Garnet Faceted Rondelles
- 1 Strand Rose Quartz Faceted Rondelles
- 1 Tube GS Hypo Cement
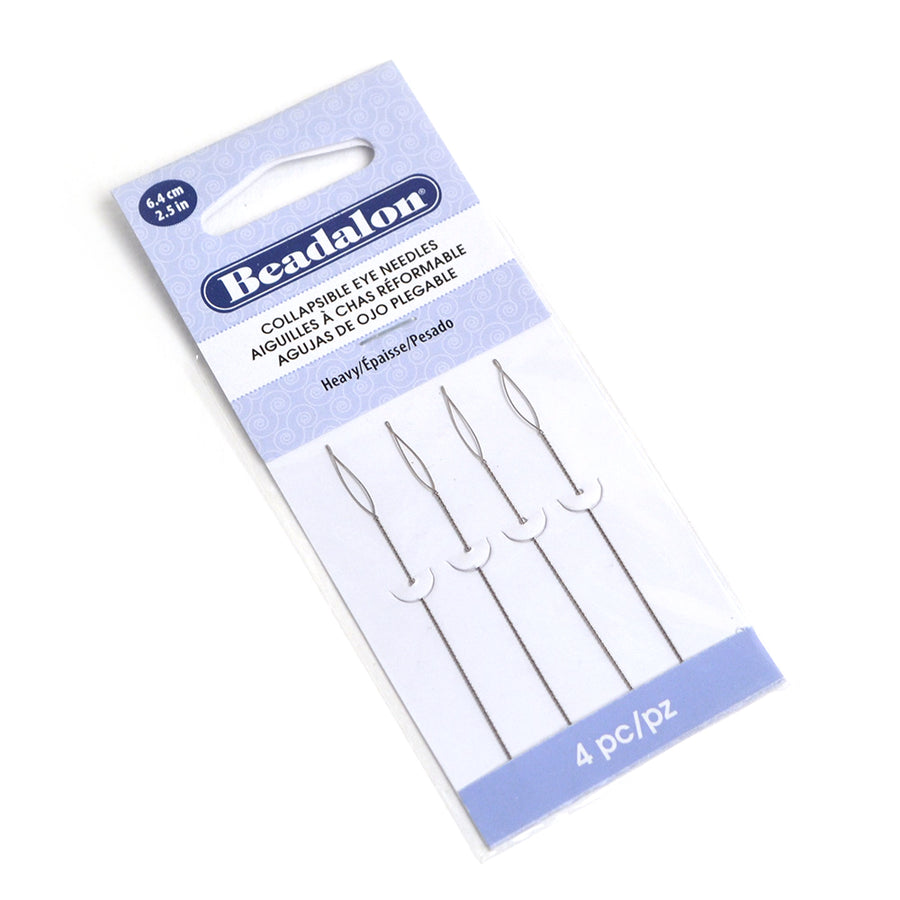
- 1 Pkg. Collapsible Eye Needles
- 1 Little Om Button
- 1 Spool Wine Micro C-Lon
- 1 Strand Garnet Faceted Rondelles
- 1 Strand Rose Quartz Faceted Rondelles
- 1 Tube GS Hypo Cement
- 1 Pkg. Collapsible Eye Needles
Level: Intermediate
Estimated time: Weekend Project
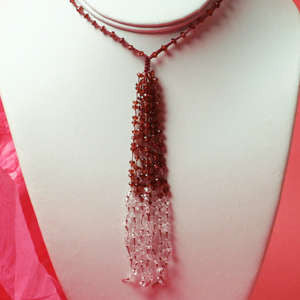
A Micro-Macramé YouTube Project using gemstones and Micro C-Lon
By Janice Parsons
With just a few ingredients...one of the things I love most about it. In the original video and project ingredients, I kept the tassel length to 2 inches and the entire project was done with garnet rondelles. By adding Rose Quartz makes it more dramatic and elegant. The techniques in the video are still the same, just allow for more thread because the tassel is 4-5 inches. The new ingredients and measurements are below.
Please watch the video before you begin. I hope you enjoy!
Heart's Desire


Project Map

Please Note: This is an older project that uses a stone with notoriously small holes. You may need to string on a single strand if you're choosing rondelles that are not the garnets and rose quartz!
This design can also be adapted to a single strand bracelet or a continuous necklace without a tassel. For an 8 inch bracelet, you need to cut 60 inches of cord. For a continuous necklace without a tassel, you need to cut 10 inches of thread for EVERY inch of the total necklace length: 18 inch necklace x 10 =180 inches.
Please watch the video in full before referring to the directions below:
1. Your deep dish design tray and velvet insert are “home” to your project. Secure the button through its shank to one side of the design tray using rat tail or remnant cord and binder clips. The fabric pieces can be used under the binder clips to help keep your board from being damaged by the clips. Cut one length of thread 5 yards. Thread on a flexible eye needle and move your needle until it rests at the halfway point of your thread. The two tails of your thread should be the same length now. Thread the needle through the button shank bringing through about 30 inches of thread. This leaves you with two long tails on one side of the button and shorter threads with needle on the other side. Tie an overhand knot close to the button shank with all of your threads.. Separate your threads so you know which has the needle and which are the long, loose tails. The thread with the needle becomes your center cords (which you string your gems on to) and the two long tails are your knotting cords. (see video)
2. String about 15 gems on to your center threads using the needle. These beads will be at the back of the necklace. Attach the needle to the opposite side of the design tray using binder clip. Leave your gems close to the needle end, you don't need them all at once. (Later, when you need to string on more gems, undo the binder clip and add more beads to your cord. Re-clip cord to tray. Repeat as you need to add beads)
3. Begin by making four compete square knots next to your overhand knot and button. Take your Right outer cord over the two center cords and under the Left cord. Then take your Left outer cord under the center cords and through the Right loop. Gently but firmly pull each cord until the completed knot rests in place. Make four complete knots before moving up your first gem (1=Right, 2=Left, 3=Right, 4=Left, 5=Right, 6=Left, 7=Right, 8=Left.) Slide up another gem and then start the count again). Continue until you reach 8+ inches of macramé. Set aside this side of the necklace. (see video)
4. Cut your second cord length of 5 yards. Thread on a new flexible eye needle and move your needle until it rests at the halfway point of your thread. The two tails of your thread should be the same length now. From the needle and center of your thread, measure 24” and loop the cords back. Measure down about 3 inches and wrap them together tightly with a short length of scotch tape. Secure the taped section of cord to the side of the board with binder clip. Secure your needle-center cords to the other end of the board. (see video)
5. To make the button loop: Flat knot using your two outer cords for approximately 2 inches below the scotch tape. Depending on the dimensions of your button, this macramé loop needs to fit all the way around the button so check as you knot you are making it long enough....but try not to overdo it! (see video)
6. Once you have the length of macramé you want for your button loop, remove the binder clip and cut the looped threads at their mid-point. Fold the macramé loop over so the first knot is directly over the last knot...like they are stacked on top of each other. Using the remant cord, feed the cord through the macramé loop and secure the remnant cord to the tray using binder clip. To complete the button loop, take two short cords in your right hand and two short cords in your left. Take the two right and loop over and through the left. Pull it tight. Take the two left and loop over and through the right. Pull it tight. Using your Hypo-tube cement, dab some glue on this completed square knot. Do NOT anything off at this point. Allow them to dry. You will use the Thread Zap 2 later to singe ends off or cut them off with snips. (see video)
7. As you did on the first half, string about 15 gems onto your needle thread and secure the needle end to the design tray, leaving your right and left knotting cords free. Slide one gem up to the button loop and macramé beneath it. Repeat the bead and knotting pattern like you did on the first side. Using your Hypo-tube cement, dab some glue on the last completed square knot. (see video)
8. You are now ready to create a tassel but first you need to macramé your two sides together. Secure both sides of your necklace to the design tray using binder clips. Your needle threads will be secured on one side of the board and your button and loop will be secured to the opposite side. This leaves two loose threads on your right and two loose threads on your left.
9. With the project itself secured to the board tightly, macramé several full knots uniting the two halves of the necklace together. I recommend 3 full square knots, but you can make this junction as long as you want. Add a very small drop of hypo-tube cement at the bottom where all the knots come together. Now the project can be unclipped as you really are done with macramé.
10. Find a point with all the cords where you can cut them evenly about 18-20” from the glued knot. Keep as much thread as possible. Using bees wax, take each thread end individually and run it over the bees wax to condition it. Angle cut each thread end to get a sharpened point. (see video)
11. Take one cord at a time and string on gems and knot underneath each one using knotting tweezers. Alternate stringing two gems together instead of just one (see video). About 2 inches down the tassel, string on your new gemstone and continue knotting.
12. The last knot at the bottom of each cord should be a double overhand knot (see video). When the tassel is complete, dab a bit of hypo-tube cement on the bottom knot of each tassel end and let glue dry. Go back to all long ends and using thread burner, singe them as close as you can to the knot. If you don't have a thread burner, cut closely with thread snips or very sharp wire cutters. (see video) You're done! Now on to making your next one!